Getting started with development in D365 FnO - Create your own project
Introduction
Before we get started with a new project, there's some words that I want to introduce.
The most basic element of a project is an object and it's metadata.
An object can be a table, a form, a report or even a EDT field.
A group of such objects form a project.
A model is used to logically group multiple projects together but in essence it holds multiple objects across multiple projects. It can also hold customization done on existing models.
A package consists of multiple such models and this is what we finally deployed in a Finance and Operations environment using LCS.

References:
3. Properties
Configuration
The first thing we would need to do to get started with D365 Finance and Operations would be to create and deploy a Finance and Operations environment.
I've demonstrated the same in my blog here.
Now, once the virtual machine has been setup, we can create our first project here.
Create a new project
Open Visual Studio which should be preinstalled in your environment.
Click on "Create a new project".

That should take your to a screen with all available project templates.

Search for "Finance Operations" and click on the below highlighted one and click on "Next."

Give your project a name and click on "Create."

It might take a few seconds depending on your Virtual Machine's capacity.
Once it's done you should be able to see the following.

Out of these, I've highlighted some sections that you'll be usually working in.
- Solution Explorer - This will show all the different projects that you have in a solution. In our case, we have the project "SampleLearningProject" under the solution "SampleLearningProject". As they both have the same name in this case.
- Application Explorer - It shows all the available objects for all the Finance and Operations packages. If you intend to use any of the existing objects, you can extend or import them by searching for them in the Application Explorer.
- Project - It shows the current working project. In the square brackets next to it, we can see the Model that this project belongs to. You can right click on the project to add new objects.
- Properties View - It shows all the properties in context of what is selected.
Create/Assign a new Model
Now, we'll create our own model and we'll be attaching our model to the current project.
In Visual Studio, click on Extension -> Dynamics 365 -> Model Management -> Create Model

Add a name of the model and the model publisher.

Click on Next.

Since, we are creating a new package, we'll click on Create a New Package.
If this is part of an existing group of customizations you can also select an existing package.

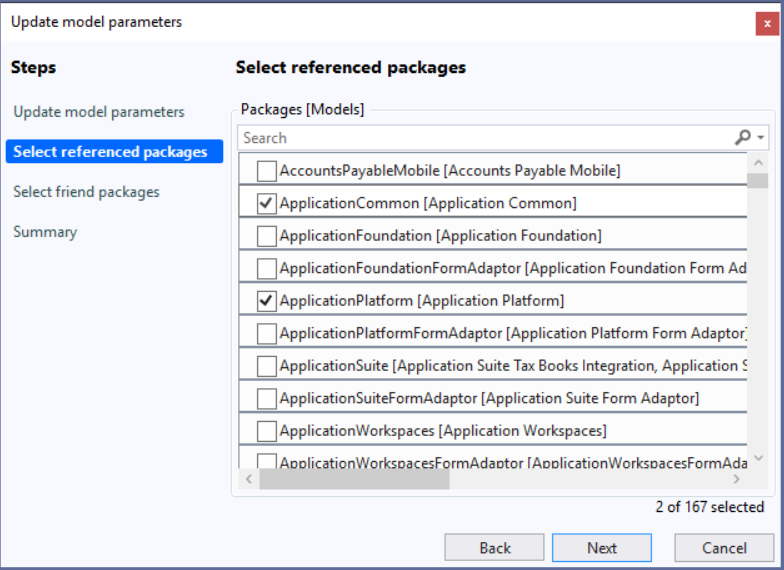
Here we define what dependencies our model will have by selecting the relevant packages.
We can make changes to this later as well if required.
Once done, click on Next.

At the last step, it shows a summary of what is going to be created.
Since, I'm going to set this Model on the project I previously created I'm going to keep "Create New Project" set to false.
Once you click on next it will take a few seconds to create the model.

Once done, I will right click on my project and click on properties.

Here, we can set the Startup Object type and Startup Object; these properties come in handy when we are deploying the project.
We can set the newly created Model onto our project by updating the Model Property.
We keep the "Synchronize Database" setting set to false so that we don't keep making unnecessary updates to the SQL database when we deploy to the environment.
We can make the changes to SQL Database Manually.

Once I click on Apply, I can see that the model has changed for my project.
If later on, I decide to add additional dependencies to my model,
I can click on Extensions -> Dynamics 365 -> Model Management -> Update Model Parameters.

From here, select the model whose dependencies you want to update and click on Next.

Make changes as necessary and click on Next.
Bonus Tip
Once additional tip I would like to add here,
Go to Tools -> Options
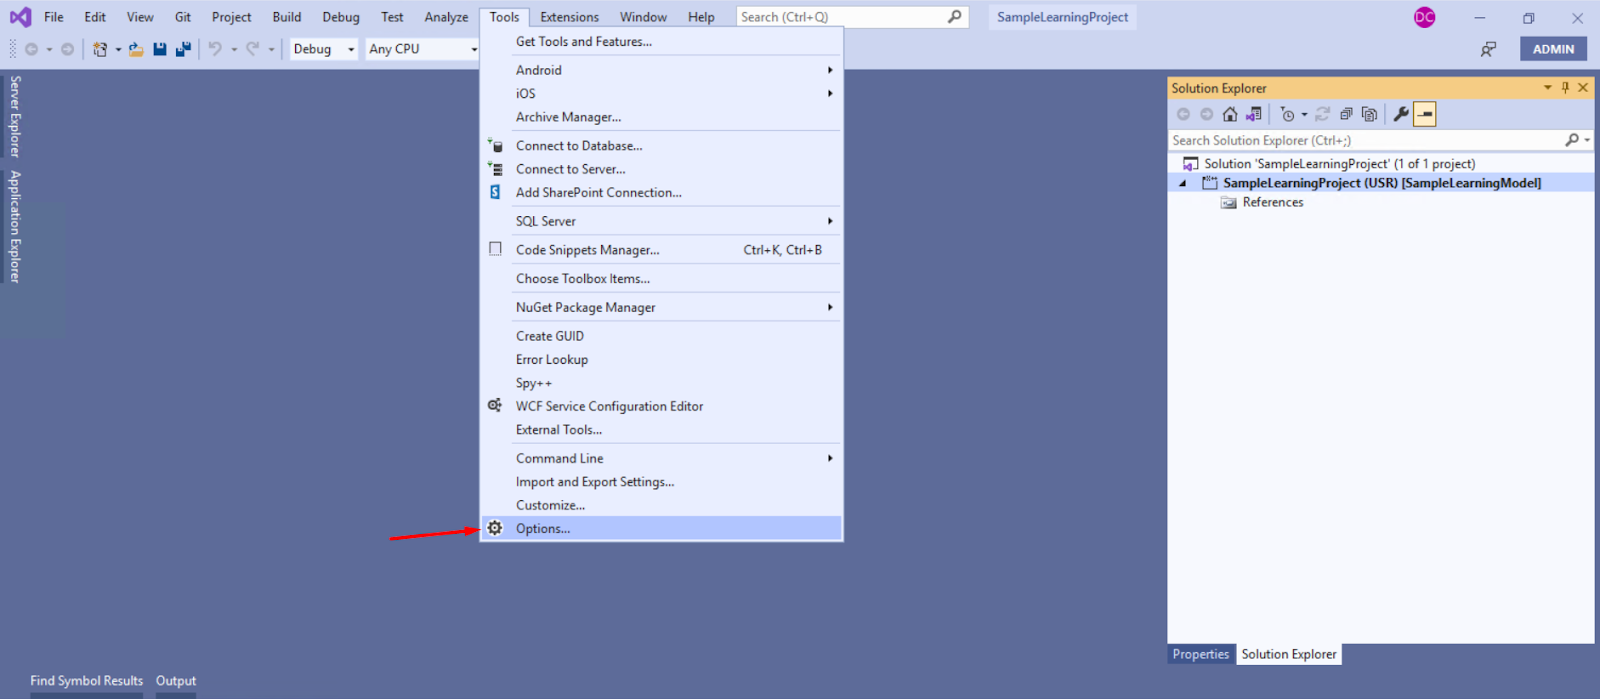
Search for Dynamics 365 -> Projects and set the "Organize projects by element type" to true.

This will automatically arrange the objects into folders based on their types and keep things organized.
Happy coding!


Comments
Post a Comment