Posts

Showing posts with the label LS Central

Configuring NAS for Scheduled Jobs in LS Central

Image
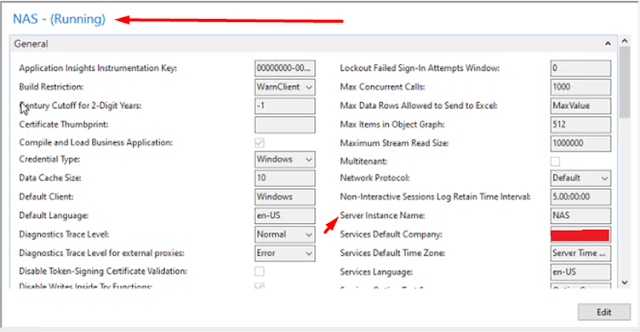
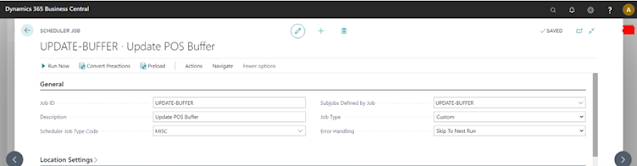
Introduction LS Central Scheduler Jobs are used for automatic background processing. These jobs use the NAS Service under the hood. We are going to see how to configure the NAS Service for LS Central. Pre-requisites LS Central Data Director References https://help.lscentral.lsretail.com/Content/LS-Insight/Setup/LS-Central-In-Cloud-LS-Insight-In-Azure/3-Machine-Or-VM.htmxt Configuration Create a new Server Instance and name it appropriately. Ensure that the account for this new Server Instance is set to User and the User has Administrator privileges. In the General tab, update the “Service Default Company” and “Service Default Time Zone.” In the NAS Services tab, set the following fields:Run NAS Services with Admin Rights : True Startup Argument : NASID,TYPEFILTER=,LOG=1,REPEAT=1 Startup Codeunit : 99001468 Startup Method : LSRSCHEDULER Restart the Server Instance. Open the Scheduler Setup in LS Central and set the “Enable NAS Scheduler” to true. Refresh the page. Conclusion Thus, we sa...

Using Scheduled Jobs to Update POS Buffer

Image
Introduction POS Search Buffer is used to display the Items in the main POS Search Drop Down. The configuration for automatically updating the POS Search Buffer is located in the POS Functionality Profile, but it is limited in nature, only 2 options exist on the POS Functionality Profile, one which defines whether the buffer should be updated automatically and the other defines the frequency in which it should be updated. We’ve faced some issues with this process running automatically such the Buffer not being updated as such we had to look for a work-around using Scheduled Jobs. Pre-requisites LS Central Business Central OnPrem or OnCloud References How to: Control When to Update Search Index and POS Buffer (lsretail.com) Configuration Create a new scheduled job with an appropriate name and description. In the Object Setup, define the “Object Type” as Codeunit and “Object ID” as 10000749, set the “Code” field as INDEX. Also ensure that the “Uses Scheduler Job Record” is set to true. I...

Block Items on POS

Image
Introduction LS Central has its own unique way of preventing Items from being sold which is different from the standard “Blocked” option field we get on the Item Card. It also comes with detailed and refined permissions which can fit most business needs. All of this is done using another related table known as “Item Status” Pre-requisites Business Central OnCloud/OnPrem LS Central v16 References LS Retail Documentation How to block Items from POS Configuration Open the Retail Item Card for the Item you want to block. Open the “Item Status” for that Item. Click on the “Status Code” and Click on “Select from full list” Create a new record with code “BLOCKED” and enable all the fields. Here, you can see all the detailed controls available. Conclusion Thus, we saw how we can Block Items on POS in LS Central and other finer controls available at our disposal in LS Central. Happy Coding!

POS Data Tables

Image
Introduction POS Data Tables are used to display data from any table in POS. The default POS Screen that we see where we enter our items for sale also consists of a Data Table. Data Tables are also used with Lookups, Record Zooms and Data Grids. In this blog, we are going to create our own POS Data Table using the Customer Table. Pre-requisites Microsoft Dynamics 365 Business Central LS Central References LS Documentation - POS Data Tables LS Documentation - Fixed Filter, POS Data Table Columns LS Documentation - Special Field Type, POS Data Table Columns Configuration The most important fields in the General Tab are: Field Description Table No. Specify the ID of the Table, whose data this Data Table will be showing on POS. Table Columns Specifies the col...

Using Custom POS Commands in LS Central

Image
Introduction LS Central provides an easy way to add Custom functionality through the use of POS External Commands. These commands are executed on the POS and let me know you how to create them. For this example, we will create a POS Command, to remove all the lines from the current transaction. Pre-requisites Microsoft Dynamics 365 Business Central On Premise LS Central V16 Configuration You will need a Codeunit in which we define all the custom commands, all your Custom commands can be added in a single Codeunit. Make sure to set the “TableNo” property to “POS Menu Line” table. In the OnRun trigger, we have to handle two cases:Registering the module and other commands Procedure to execute when command is called. For handling the first case, we create a procedure “Register” which takes a “POS Menu Line” as a parameter. In this procedure we use the “POS Command Registration” codeunit to register this module and all the associated commands. I prefer to use Global Labels to store the Modu...

Create Sales Order Quote From POS in LS Central

Image
Introduction LS Central allows us to create a Sales Order or Sales Quote directly from POS. I will be demonstrating the same below in this blog. Pre-requisites LS Central v16+ Business Central OnPrem/OnCloud References LS Central Documentation Configuration Search for “Sales Type” in Business Central Create a new record titled “SALES ORDER” in it. Make sure to set the Suspend Type to Sales Order/Sales Quote as required. I am setting it to Sales Order for this example. Log In to your POS with a POS Super User account and Right click on a button and go to button properties, I’m using the default “SUSPEND” button for example here. Set the command to “SUSPEND” and the parameter to the “Sales Order” record you created a few moments ago. Once this is done, create a new Transaction with a Customer and then click on the button. In the confirmation box, click on Yes. If you check in Business Central now, you can see that a new Sales Order has been created. You can also see the same from POS its...

Customizing POS Receipt in LS Central

Image
Introduction POS Receipts are generated after every transaction that occurs on POS. The default receipt provided by LS Central is generally sufficient but as is in all things there are always exceptions. There are two methods that we can modify the POS Receipts and we are going to see them both. Pre-requisites Microsoft Dynamics 365 Business Central LS Central Configuration This is the default receipt provided by LS.  I have marked division of sections using color.  Red - Header   Green - Body  Blue - Footer Without going with customization, we can still make some degree of changes to the standard layouts. Using Receipt Printing from POS Terminal / Store Card We can add text directly into the Header or the Footer of the POS Receipts and also define some basic properties like bold, italic or wide for the text.  It can be defined at POS Level or Store Level i.e. for individual POS Terminals or for all the POS Terminals in a Store. Go to POS Terminal Card. Go to Pr...