Posts

Showing posts from 2021

Configuring Data Director Part 2

Image
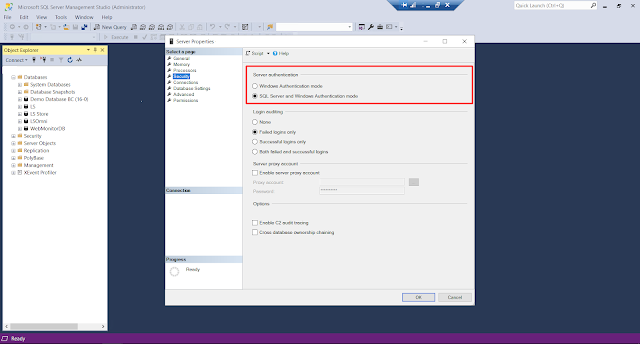
Introduction In the   last part , we saw how to install Data Director, configure Network connections and modify Host file. In this part, we will see the SQL Server and Business Central side of configurations and how to test if everything is configured properly. Pre-requisites Microsoft Dynamics 365 Business Central LS Central Data Director V3.02 References Data Director User Guide Configuration SQL Server Set the Authentication Mode for the Server Instance to “SQL Server and Windows Authentication.” Go to your Server Instance and create a new Login. Make sure to set the User Mapping to your database. Go to your Database and create a new User. Make sure to set the “Membership” to “db_owner” To confirm if the SQL User has been configured properly, Set the Authentication Mode to SQL and try to login with the newly created User. If you are able to login successfully, then we move to the next part. Distribution Location Set the “Data Director Mode” to TCP and the “Distribution Server” to po

Configuring Data Director Part 1

Image
Introduction Data Director is one of the applications from LS Retail and it is essential to keep the data between the POS, Stores and HO in sync. Data Director is used to move data between databases, generally used with MS SQL Server but it is not limited to it and can be used with databases like MySQL as well. A rule of thumb is that If the database supports ODBC then the Data Director should be able to use it. Read the “Data Director User Guide” for more information. Pre-requisites Microsoft Dynamics 365 Business Central LS Central Data Director V3.02 References Data Director User Guide Configuration Data Director Installation Open the data director installation package. Select or deselect the components as you need, if you’re setting up Data Director for a new system the following are sufficient. If you have not changed the “Default Web Site” name in IIS, then you can leave this step unchanged. Click install and wait for a few seconds. To test if the Data Director service is running

Enable Changelog in Business Central

Image
Introduction Business Central provides us with Change Log which helps us in keeping track of the changes made to a particular field in a particular table. Pre-requisites Business Central OnPrem or Cloud References Auditing Changes - Microsoft Docs Configuration Search for Change Log in Business Central. Select the tables you want to enable the change log for. You can set the change log for a particular set of fields or for all the fields in the table. Click on the three dots next to the “Some Fields” and select the fields you want to audit. Set Change Log Activated to true. Conclusion Thus we saw how we can configure Change Log for auditing and tracking changes in Business Central. Happy Coding!

Using Security Filters in Business Central

Image
Introduction Business Central allows various levels of security that can be used to restrict User access to different features or objects. We can use Permission Sets to prevent User access to specific objects like reports or pages. For more refined, row-level authorization we can use Security Filters to restrict access to individual record based on some filters. Pre-requisites Business Central OnCloud or OnPremise. References Security Filters - Microsoft Documentation Configuration Suppose, you want the User to only be able to access a specific set of Customers. You can either create your own Permission Set from scratch, in which you will describe all the objects that the User will have access to or you can copy one of the existing ones by clicking on “Copy Permission Set” and then entering a new name for the permission set. Do note that you require proper permissions to make changes to Permission Sets as well. Open the Permission Set, by clicking on the “Permissions” action and Scroll

Configuring Logo Printing on POS

Image
Introduction Every Retail Store has a certain Logo to printing on their POS Receipt. LS Central provides build in support for this functionality and makes it a matter of minutes to change the Logo and/or it’s properties. In this blog, we will be looking at how to configure this feature. Pre-requisites Microsoft Dynamics 365 Business Central LS Central References LS Central Documentation Configuration First, we need to make sure that the image we are passing is proper. Make sure that the Image is in Bitmap or .bmp. Other than this, unless your POS Printer supports it, make sure the image is gray scaled. I used this website for conversion. Store the Image on the local system, make sure the folder and the image do not require any special permissions to access. In Business Central, search for POS Printers and open the POS Receipt Printer which you are using. In the Logo tab, add the location of the Image and set the other properties. Since, we are using the Image which is on our Local Syst

Configuring Barcodes on Receipts in LS Central

Image
Introduction Refunding a transaction is an everyday occurrence in Retail. LS Central provides us with the functionality to initiate the refund of a transaction by simply scanning one barcode! In this blog, we will be looking at how to configure this feature. Pre-requisites Business Central LS Central v16 References Printing Receipt Barcodes - LS Central Documentation Configuration From Business Central, open the POS Terminal for the current Store. In the “Printing” tab, Set the “Receipt Barcode” ID to 101. Set the “Print Receipt BC Type” to “CODE39” or “CODE128_A”. You can optionally adjust the Barcode Height and Width but depending upon the POS Printer it may or may not be scannable as the resolution of the barcode suffers. The default parameters which are applied if you leave the fields to 0 are width - 8 and height 40. Set the “Receipt Barcode” to true. Once this is done, simply run the POS and generate a Receipt. When the Barcode at the bottom of the Receipt is scanned it should di

Using Web Content on POS

Image
Introduction LS Central allows us to use HTML content on the POS which includes both Text and Images. Users can add extra information related to the Items here which can assist in the POS Users to make the sales much more efficiently. In this blog, I’ll be demonstrating how to configure the same. Pre-requisites Microsoft Dynamics 365 Business Central LS Central v16 References LS Central Documentation Configuration Open Business Central and search for POS Terminals. Open the POS Terminal for the current Store and set the “Item HTML” and “Item Image” property to true. Search for Retail Items and open the Item you want to add description and image for. Open the Item Card and Go to Navigate -> Master Data -> Item HTML. Here you can specify the description for the Item that you want to be displayed on the POS and click on Save. For instance: After that go to Navigate -> Master Data -> Images and click on New. Click on Import and select the Image of that Item and then Click on OK