Posts

Using Security Filters in Business Central

Image
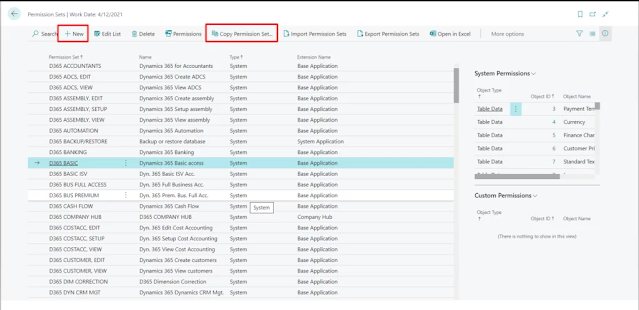
Introduction Business Central allows various levels of security that can be used to restrict User access to different features or objects. We can use Permission Sets to prevent User access to specific objects like reports or pages. For more refined, row-level authorization we can use Security Filters to restrict access to individual record based on some filters. Pre-requisites Business Central OnCloud or OnPremise. References Security Filters - Microsoft Documentation Configuration Suppose, you want the User to only be able to access a specific set of Customers. You can either create your own Permission Set from scratch, in which you will describe all the objects that the User will have access to or you can copy one of the existing ones by clicking on “Copy Permission Set” and then entering a new name for the permission set. Do note that you require proper permissions to make changes to Permission Sets as well. Open the Permission Set, by clicking on the “Permissions” action and Scroll...

Configuring Logo Printing on POS

Image
Introduction Every Retail Store has a certain Logo to printing on their POS Receipt. LS Central provides build in support for this functionality and makes it a matter of minutes to change the Logo and/or it’s properties. In this blog, we will be looking at how to configure this feature. Pre-requisites Microsoft Dynamics 365 Business Central LS Central References LS Central Documentation Configuration First, we need to make sure that the image we are passing is proper. Make sure that the Image is in Bitmap or .bmp. Other than this, unless your POS Printer supports it, make sure the image is gray scaled. I used this website for conversion. Store the Image on the local system, make sure the folder and the image do not require any special permissions to access. In Business Central, search for POS Printers and open the POS Receipt Printer which you are using. In the Logo tab, add the location of the Image and set the other properties. Since, we are using the Image which is on our Local Syst...

Configuring Barcodes on Receipts in LS Central

Image
Introduction Refunding a transaction is an everyday occurrence in Retail. LS Central provides us with the functionality to initiate the refund of a transaction by simply scanning one barcode! In this blog, we will be looking at how to configure this feature. Pre-requisites Business Central LS Central v16 References Printing Receipt Barcodes - LS Central Documentation Configuration From Business Central, open the POS Terminal for the current Store. In the “Printing” tab, Set the “Receipt Barcode” ID to 101. Set the “Print Receipt BC Type” to “CODE39” or “CODE128_A”. You can optionally adjust the Barcode Height and Width but depending upon the POS Printer it may or may not be scannable as the resolution of the barcode suffers. The default parameters which are applied if you leave the fields to 0 are width - 8 and height 40. Set the “Receipt Barcode” to true. Once this is done, simply run the POS and generate a Receipt. When the Barcode at the bottom of the Receipt is scanned it should di...

Using Web Content on POS

Image
Introduction LS Central allows us to use HTML content on the POS which includes both Text and Images. Users can add extra information related to the Items here which can assist in the POS Users to make the sales much more efficiently. In this blog, I’ll be demonstrating how to configure the same. Pre-requisites Microsoft Dynamics 365 Business Central LS Central v16 References LS Central Documentation Configuration Open Business Central and search for POS Terminals. Open the POS Terminal for the current Store and set the “Item HTML” and “Item Image” property to true. Search for Retail Items and open the Item you want to add description and image for. Open the Item Card and Go to Navigate -> Master Data -> Item HTML. Here you can specify the description for the Item that you want to be displayed on the POS and click on Save. For instance: After that go to Navigate -> Master Data -> Images and click on New. Click on Import and select the Image of that Item and then Click on OK...

Using POS Tags

Image
Introduction Tags are small pieces of Information that we can display on the POS. This information may be a field from a table or just some text. If we are using a field from some table, it is necessary that, the table can be referenced using only the fields available in the current “POS Transaction” record. There are multiple types of Tags available like: System :- These Tags display system information. Transaction :- These Tags display information regarding the current Transaction. Session :- These Tags display information regarding the current Session. Pre-requisites Microsoft Dynamics 365 Business Central LS Central References LS Central - Tags Configuration In most cases, we are going to use “Transaction” type Tags so let take an example. In this example, we are going to create a Tag which will display the manager of the Store. To create a Tag: Search for POS Tag in BC Create a new POS Tag, by convention the naming is <#TagName> so we are going to follow the same. Since th...